Telephone: +8618730949119
E-mail: 1299343081@qq.com
2 月 . 15, 2025 21:18
Back to list
stoves oven door seal replacement
When it comes to home maintenance and ensuring kitchen appliances function optimally, one often overlooked yet critical component is the oven door seal. Over time, these seals can wear out, leading to inefficiencies in energy use, uneven cooking, and safety concerns. Here's a comprehensive guide on stove oven door seal replacement, drawing from real experiences, professional insights, and authoritative sources to help you handle this task with trust and confidence.
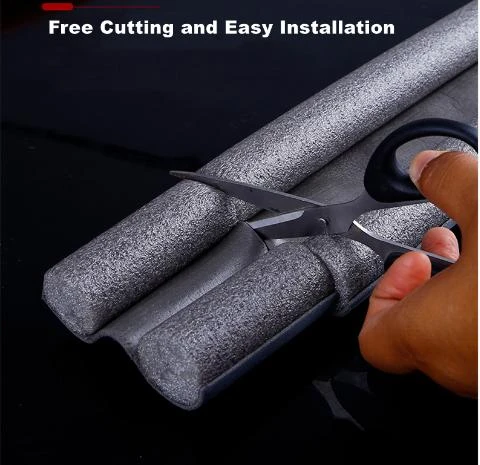
3. Remove the Old Seal Most oven door seals are simple to remove. Typically, these will either pull out or are attached with a series of clips or screws. Gently remove any screws or clips securing the seal and carefully pull the old gasket off. 4. Clean the Seal Area With the old seal removed, take a few moments to clean the surrounding area. Use a mild detergent to remove any grease or built-up debris, as this ensures the new seal adheres properly. 5. Install the New Seal Begin by aligning the new seal with the oven’s door, starting at one corner. If the seal is secured with clips, align them into the designated holes. If using screws, ensure they are securely fastened without over-tightening, which can damage the new seal. 6. Test the Installation After installation, test the new seal by closing the oven door and checking for any gaps. A properly installed seal should fit snugly against the oven body, with no noticeable spaces. Professional Tips for Longevity and Maintenance To extend the life of your newly replaced oven door seal - Regular Cleaning Regularly wipe down the seal with a damp cloth after usage to reduce grease build-up. - Inspection Periodically inspect the seal for wear and tear, especially if the oven is used frequently. - Avoid Abrasive Cleaners Use mild cleaning products to avoid abrading or weakening the seal material. The Final Word on Oven Door Seal Replacement Replacing an oven door seal is a straightforward yet crucial maintenance task that not only improves appliance efficiency but also enhances kitchen safety. By following these detailed guidelines and using the right tools and replacement parts, you can ensure your oven operates at peak performance. For those less comfortable performing DIY repairs, consult with a professional appliance technician, guaranteeing the job is completed with expertise and authority. Regardless of your approach, this simple step can save energy costs, improve cooking results, and contribute to a safer kitchen environment.
3. Remove the Old Seal Most oven door seals are simple to remove. Typically, these will either pull out or are attached with a series of clips or screws. Gently remove any screws or clips securing the seal and carefully pull the old gasket off. 4. Clean the Seal Area With the old seal removed, take a few moments to clean the surrounding area. Use a mild detergent to remove any grease or built-up debris, as this ensures the new seal adheres properly. 5. Install the New Seal Begin by aligning the new seal with the oven’s door, starting at one corner. If the seal is secured with clips, align them into the designated holes. If using screws, ensure they are securely fastened without over-tightening, which can damage the new seal. 6. Test the Installation After installation, test the new seal by closing the oven door and checking for any gaps. A properly installed seal should fit snugly against the oven body, with no noticeable spaces. Professional Tips for Longevity and Maintenance To extend the life of your newly replaced oven door seal - Regular Cleaning Regularly wipe down the seal with a damp cloth after usage to reduce grease build-up. - Inspection Periodically inspect the seal for wear and tear, especially if the oven is used frequently. - Avoid Abrasive Cleaners Use mild cleaning products to avoid abrading or weakening the seal material. The Final Word on Oven Door Seal Replacement Replacing an oven door seal is a straightforward yet crucial maintenance task that not only improves appliance efficiency but also enhances kitchen safety. By following these detailed guidelines and using the right tools and replacement parts, you can ensure your oven operates at peak performance. For those less comfortable performing DIY repairs, consult with a professional appliance technician, guaranteeing the job is completed with expertise and authority. Regardless of your approach, this simple step can save energy costs, improve cooking results, and contribute to a safer kitchen environment.
Next:
Latest news
-
Silicone Seal Strip: The Ultimate Solution for Your Sealing NeedNewsNov.01,2024
-
Keep the Heat: The Importance of Seal for Oven DoorsNewsNov.01,2024
-
Essential Guide to Corner Protectors for Your FurnitureNewsNov.01,2024
-
Enhance Your Home with Silicone SolutionsNewsNov.01,2024
-
Efficient Maintenance of Melamine Sealing StripsNewsNov.01,2024
-
Comparison of Different Edge Sealing ProcessesNewsNov.01,2024
-
Types of Door Bottom Seal Strips and Their Best UsesNewsOct.25,2024